VuePress-theme-hope2 本地部署个人网站
1. 运行环境设置
① 编辑器
一个方便快捷的编辑器在博客的搭建过程是功不可没的。推荐用VSCode编写和运行VuePress项目
在下载界面点击左侧的蓝色按钮,选择你的操作系统,并下载。
双击安装包打开,同意用户协议。
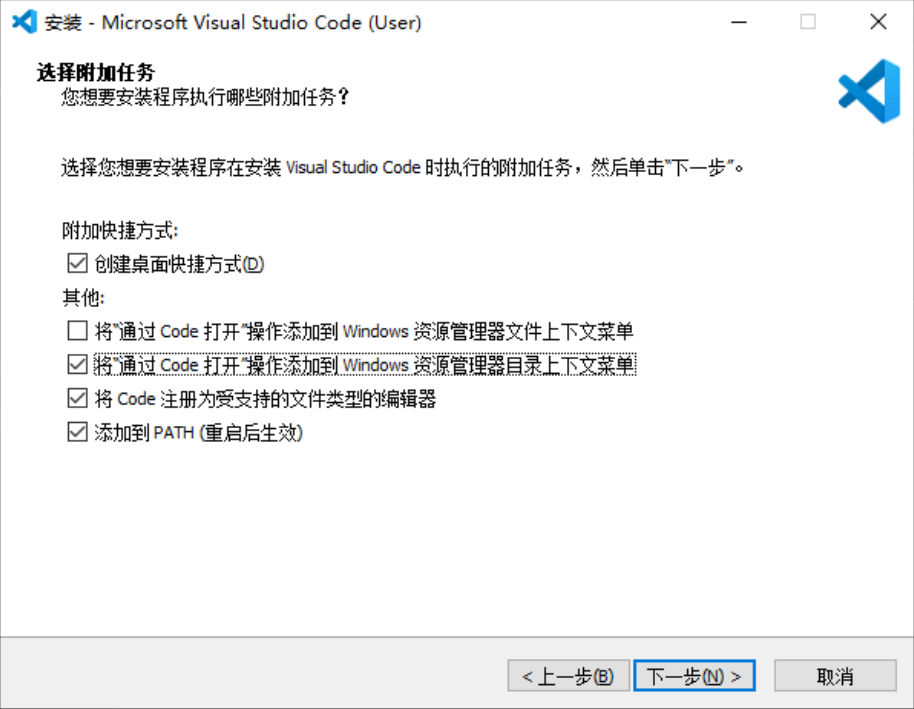
在下载过程中 ,请务必全选下列选项:
在 VS Code 初次启动后,若未提前安装 Git 可能会提示未找到 Git 软件,忽略即可。
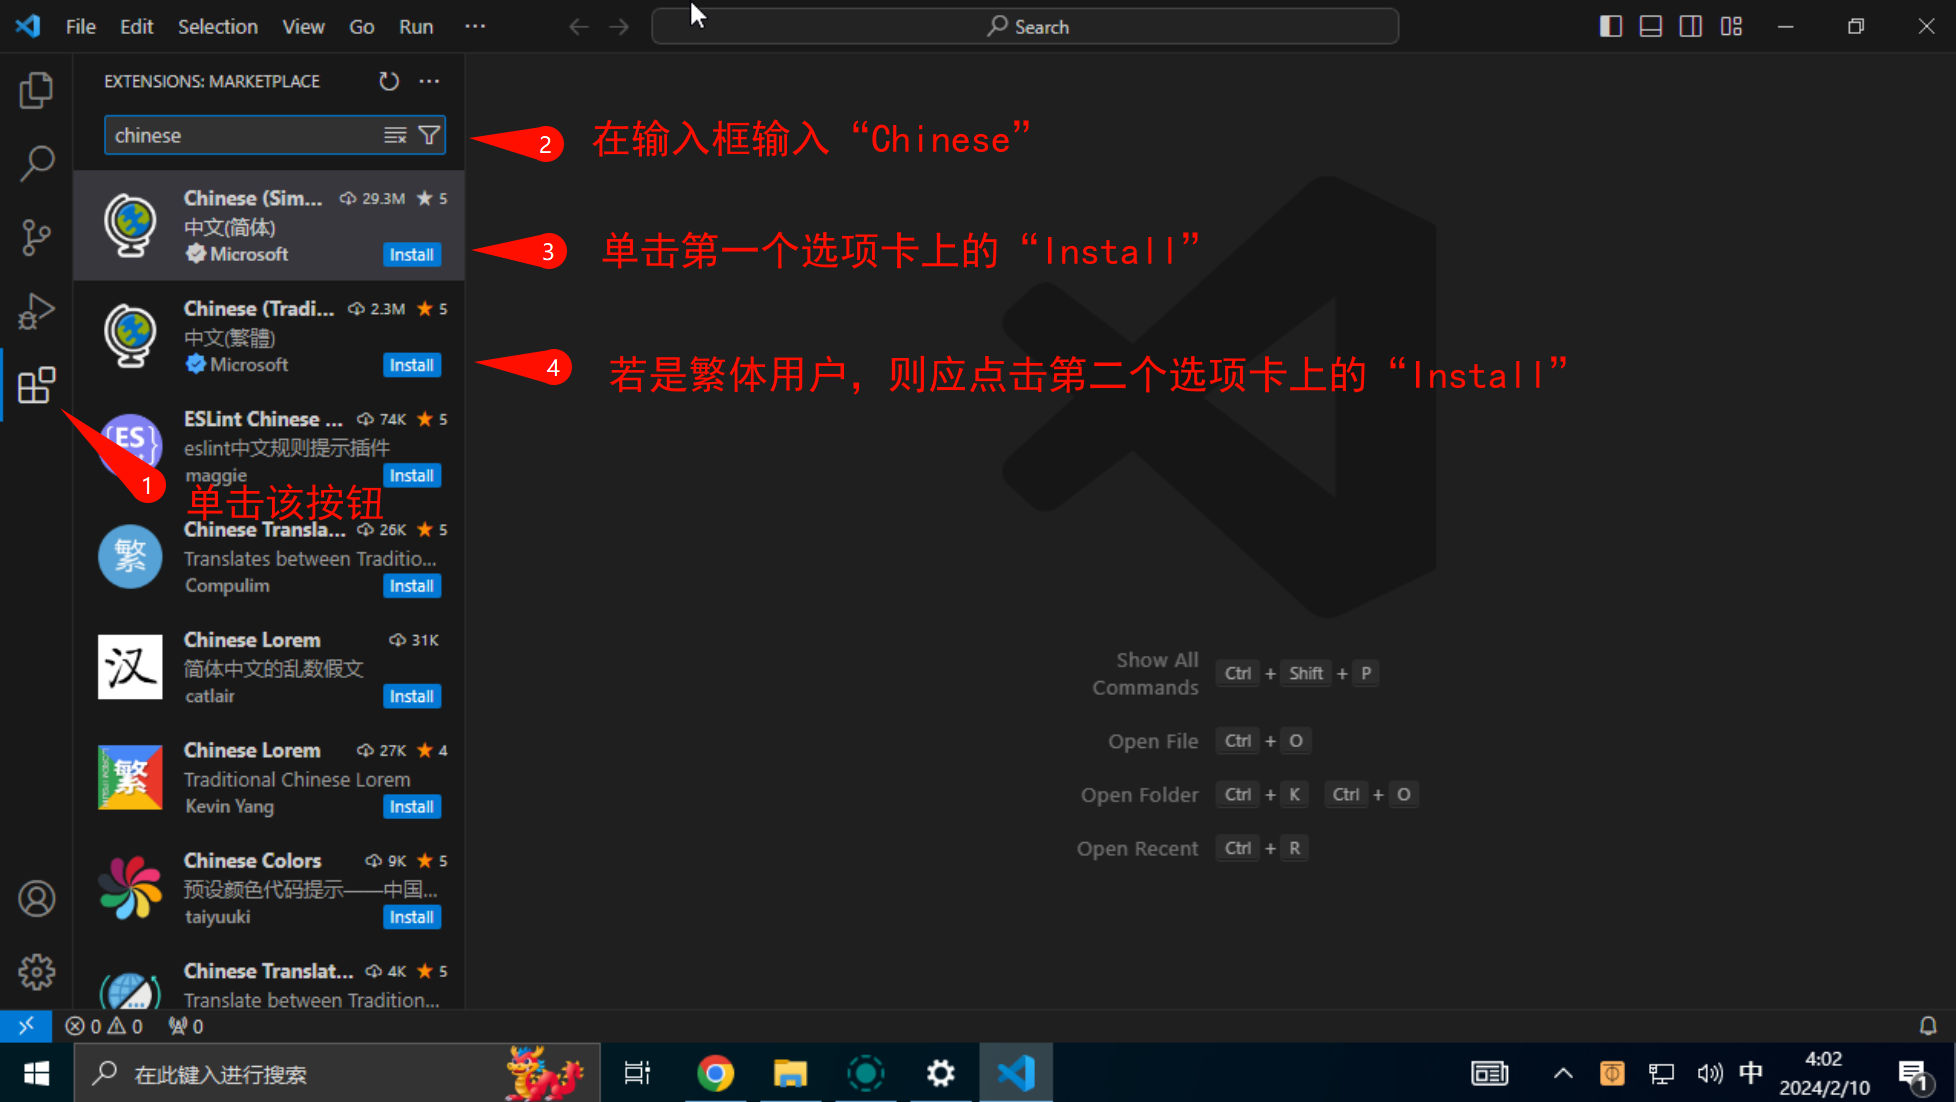
推荐立即执行简体中文扩展安装以保证界面语言为简体中文。操作方法:
- 单击左侧导航栏的“Extensions”按钮。
- 在弹出的输入框中输入“chinese”。
- 点击第一个选项卡上的“Install”按钮。若是繁体用户,则应点击第二个选项卡上的“Install”按钮。
- 在下载完成后,左下角会出现弹窗,点击弹窗中的“Change Language and Restart”,等待重启后即安装完毕。
[!tip] 当你安装 VS Code 并第一次打开的时候,VS Code 会自动检测当前系统语言并在右下角推荐你安装对应语言的扩展,点击按钮即可自动安装。
② Node.js
[!Introduce] Node.js®open in new window 是一个基于 Chrome V8 引擎open in new window 的 JavaScript 运行时环境。
你需要下载并安装最新的长期维护版。
点击 下载地址 左侧的绿色按钮 (LTS)。
运行安装包,保持全部默认即可
[!important] 如果你真的是个小白,请不要改默认安装目录,以免你在出现问题时找不到对应的文件夹。
Node.js 本身只会占据几十 M 的空间!
③ pnpm
在你安装 Node.js 之后,在终端中输入下列命令启用 corepack:
corepack enable
[!tip] 我们推荐你使用 pnpm 作为项目管理器,因为 VuePress 和 VuePress Theme Hope 都是通过 pnpm 来管理依赖的。
pnpm 的一些功能可以保证你拥有正确的依赖,并且它能加速安装。
但是如果在使用pnpm安装的时候出现了错误,改为使用npm是一种不赖的选择
2. 搭建项目
① 选择项目位置
为了避免偶然间触发一些奇怪的问题,而你自己不会解决,请尽量避免使用包含中文文字、表情符号或空格的文件路径 (不好的例子: C:\Users\小张\Desktop\VuePress 项目\Hope 主题❤️\)。
建议使用纯英文路径 (好的例子: D:\projects\vuepress-theme-hope\)
② 初始化项目
如果你选择了一个主题,请务必使用该主题提供的脚手架工具创建项目。这样可以减少很多配置上的麻烦。
在选定的文件夹中打开终端。
右键点击文件夹,然后选择”New Terminal at Folder”。
右键点击文件夹,然后选择”Open in Terminal”。
使用文件管理器打开对应文件夹,然后在上方的地址栏中输入 cmd 并按下回车。
pnpm create vuepress-theme-hope my-docs
yarn create vuepress-theme-hope my-docs
npm init vuepress-theme-hope my-docs
文件夹参数
这里的 my-docs 是一个参数,代表 VuePress Theme Hope 项目的文件夹名称,在本教程中,我们将项目生成至当前目录下的 my-docs 文件夹。
如果你有需求,你可以更改此参数来使用一个新文件夹名称。
中文显示
如果你的英语很不好,请在第一次选择中通过键盘 ↓ 选择 简体中文 并回车来在后续流程中使用中文进行显示。
开发服务器
如果你在模板初始化成功后选择立即启动开发服务器,稍等片刻,你就可以在浏览器地址栏输入 localhost:8080/ 访问开发服务器了。
Need to install the following packages:
	create-vuepress-theme-hope@2.0.0-beta.233
Ok to proceed? (y) y
? Select a language to display / 选择显示语言 简体中文
? 选择包管理器 npm
? 你想要使用哪个打包器? vite
生成 package.json...
? 设置应用名称 shenb-blog
? 设置应用版本号 2.0.0
? 设置应用描述 A project of vuepress-theme-hope
? 设置协议 MIT
? 项目需要用到多语言么? No
? 是否需要一个自动部署文档到 GitHub Pages 的工作流? Yes
? 你想要创建什么类型的项目? blog
生成模板...
? 选择你想使用的源 当前源
安装依赖...
这可能需要数分钟,请耐心等待.
我们无法正确输出子进程的进度条,所以进程可能会看似未响应
added 293 packages in 26s
模板已成功生成!
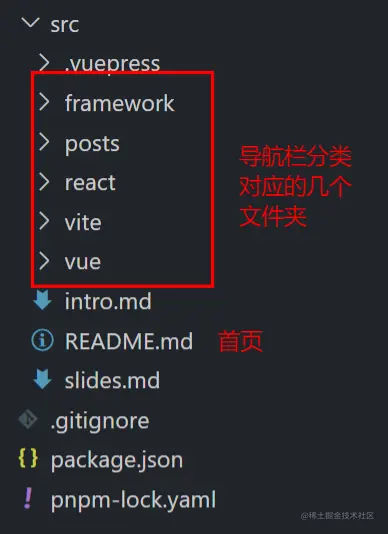
初始化目录结构如下
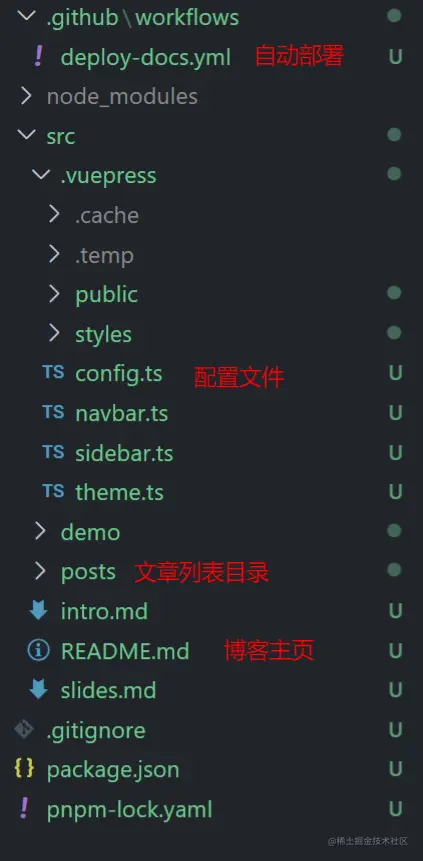
3.1 首页配置
其中,src 目录下的 README.md即为博客或者文档的首页。
等待下载完毕,执行 npm run docs:dev
打开页面,可以看到博客的首页如下:
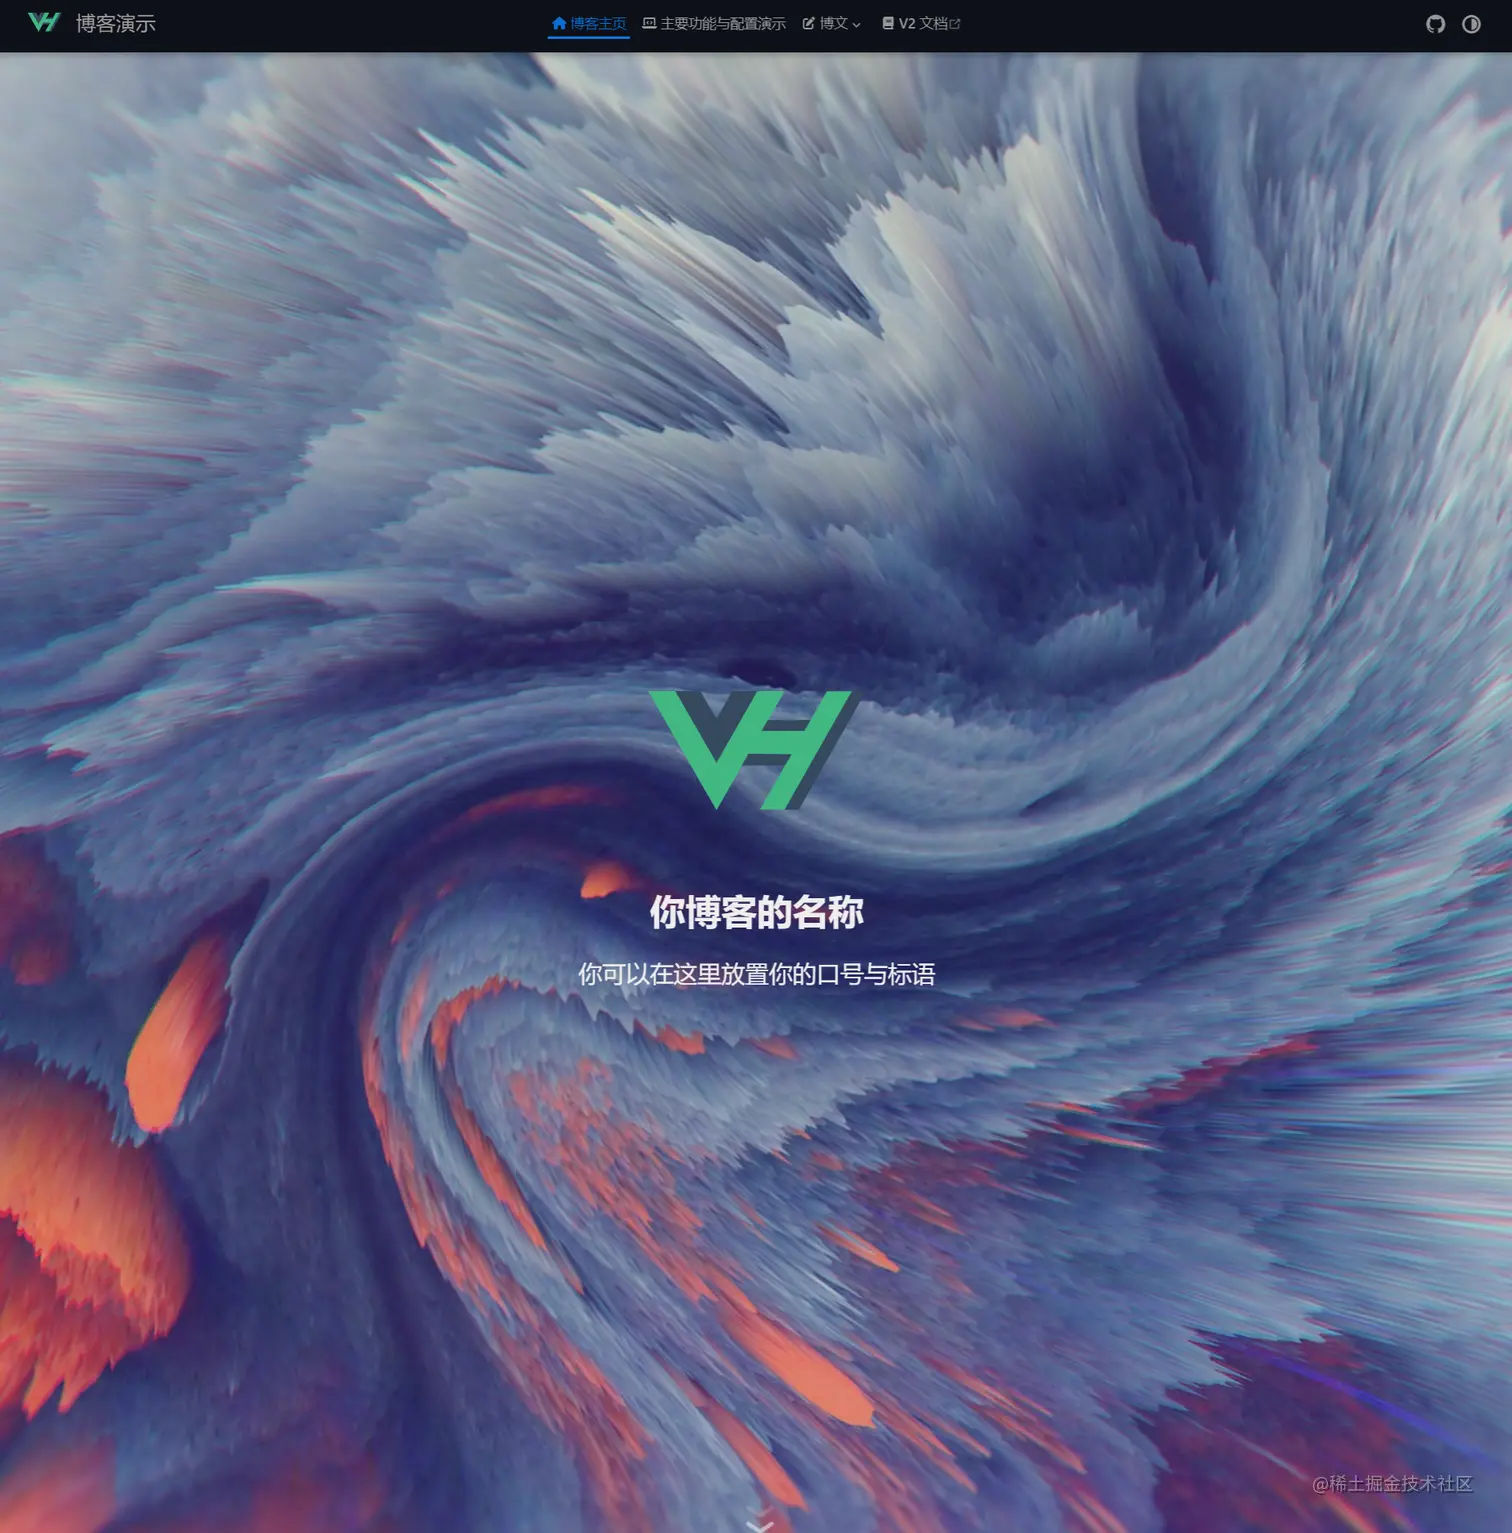
可以通过设置heroFullScreen: false,关闭hero背景全屏。
下滑之后文章的列表如下:
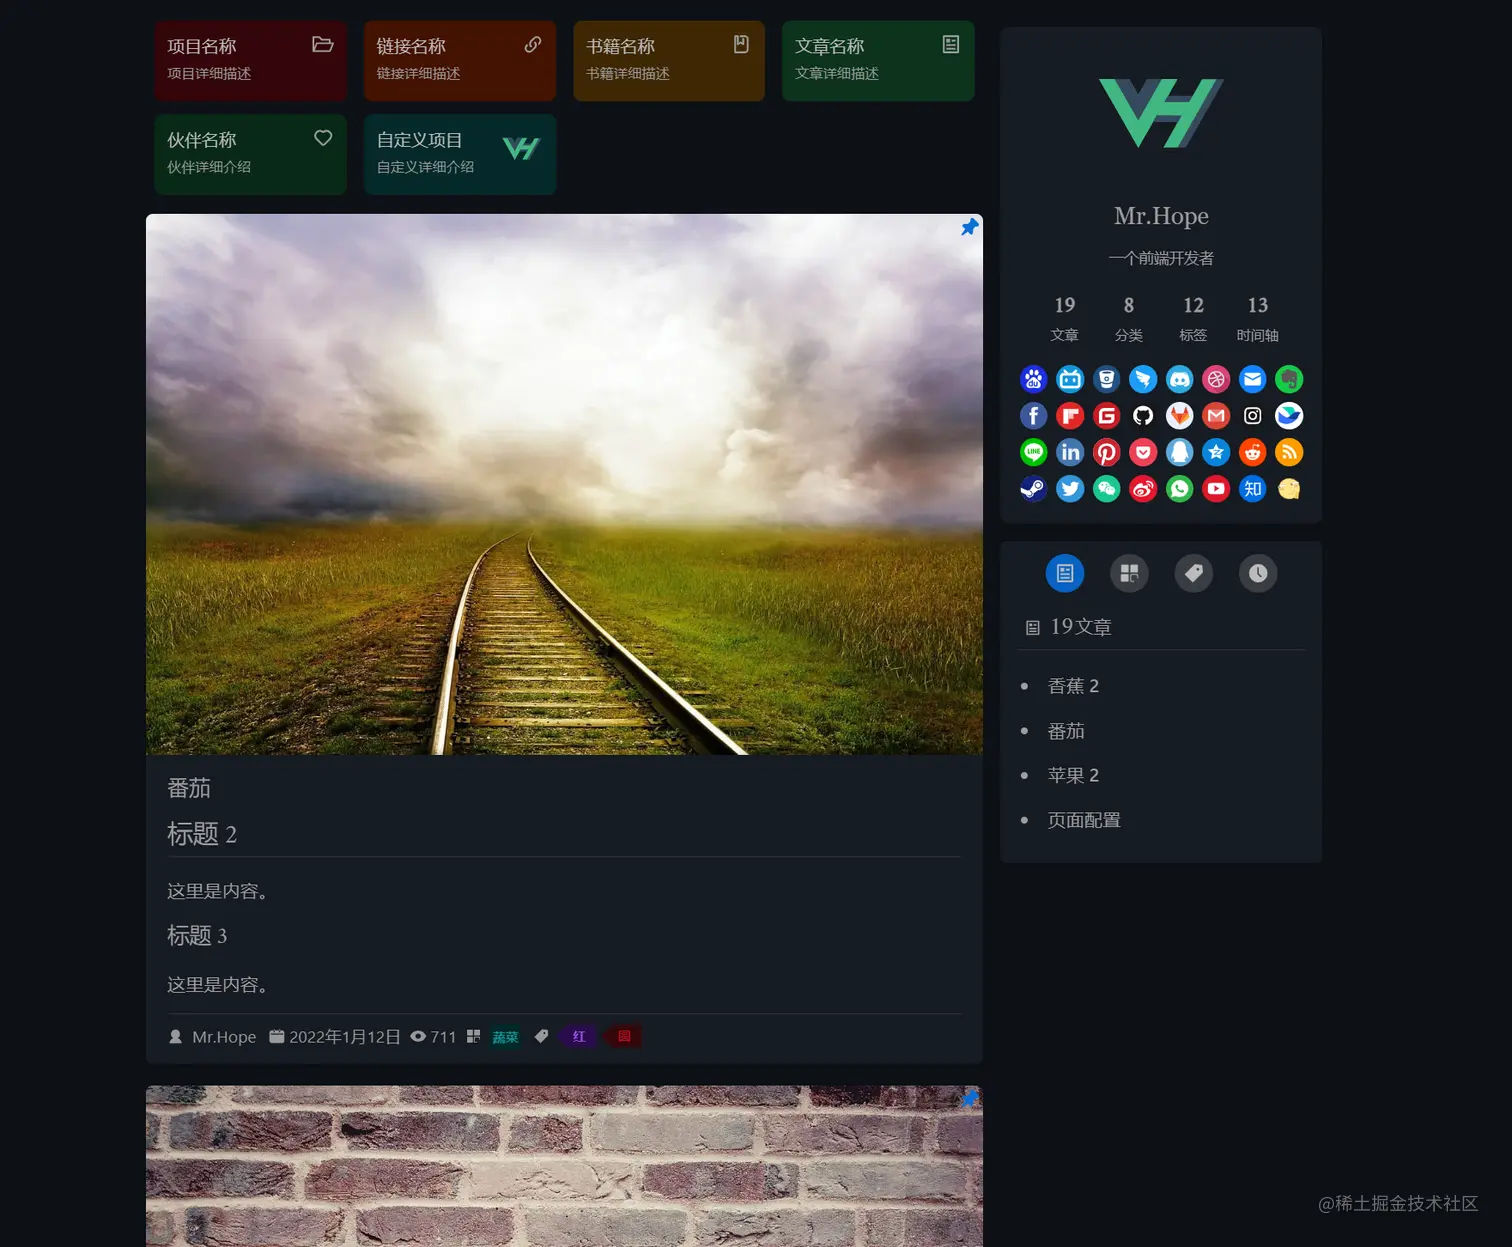
文章的列表来自于项目中所有的markdown文件,你可以在每个md文件的frontmatter中设置文章的标题、封面、分类、标签、日期、是否在文章列表中显示。
---
title: 🚀🚀vue3自定义指令实践
isTimeLine: true
date: 2023-07-03
category:
  - 前端
tag:
  - JavaScript
  - Vue
---
通过设置article 为 false将文章在列表中排除。
站点的基本信息、顶部的hero信息、项目链接、底部的footer信息都可以在README.md中配置。
我的配置如下:具体可以参考:博客主页 Frontmatter 配置 | vuepress-theme-hope
home: false
layout: BlogHome
icon: home
title: 首页
heroImage: /logo.svg
heroText: 萌萌哒草头将军
heroFullScreen: false
tagline: 千里之行,始于足下
projects:
  - icon: react
    name: RaETable
    desc: 一款开箱即用的antd表格组件库
    link: https://mmdctjj.github.io/raetable
  - icon: setting
    name: console-loader
    desc: 自动清除其他开发者console的loader
    link: https://github.com/mmdctjj/remove-others-console-loader


footer: 萌萌哒草头将军
3.2 导航栏配置
在开始之前你需要明确,你的导航栏需求是啥样的(大白话就是哪些栏目需要在侧边栏展示,哪些在侧边栏展示)
我的思路是,根据文章的分类,将相同的分类文章放在同一目录下,每个目录对应一个导航栏目。
导航栏的相关设置在 navbar.ts文件中。
默认为字符串,对应 src 目录下的文件路径,你可以省略 .md 扩展名,以 / 结尾的路径会被推断为 /README.md。
例如:
import { navbar } from "vuepress-theme-hope";

export default navbar([
  "/", // 对应首页,即src/README.md
  '/react/', // 对应src/react/README.md
]);
也可以是对象,基本格式如下:
import { navbar } from "vuepress-theme-hope";

export default navbar([
  {
    text: "博文",
    icon: "pen-to-square",
    prefix: "/posts/", // 对应 src/posts 目录
    children: [
      {
        text: "苹果",
        icon: "pen-to-square",
        prefix: "apple/", // 对应 src/posts/apple 目录
        children: [
          { text: "苹果1", icon: "pen-to-square", link: "1" },
          { text: "苹果2", icon: "pen-to-square", link: "2" },
          "3",
          "4",
        ],
      },
      "tomato",
      "strawberry",
    ],
  },
  {
    text: "V2 文档",
    icon: "book",
    link: "https://theme-hope.vuejs.press/zh/", // link代码外链地址
  },
]);
我的设置为:
import { navbar } from "vuepress-theme-hope";

export default navbar([
  "/",
  {
    text: 'React系列',
    icon: 'react',
    link: '/react/'
  },
  {
    text: 'Vue系列',
    icon: 'vue',
    link: '/vue/'
  },
  {
    text: 'Vite系列',
    icon: 'tool',
    link: '/vite/'
  },
  {
    text: '新框架尝鲜系列',
    icon: 'geometry',
    link: '/framework/'
  },
  {
    text: '杂谈',
    icon: 'article',
    link: '/posts/'
  },
  {
    text: '标签',
    icon: 'tag',
    link: '/tag/javascript/'
  },
  {
    text: '分类',
    icon: 'categoryselected',
    link: '/category/前端/'
  },
  {
    text: '时间轴',
    icon: 'time',
    link: '/timeline/'
  },
]);
我将一些默认的路由也加进了导航栏配置中,比如时间轴、标签、分类等。

3.3 侧边栏配置
侧边栏的配置在 sidebar.ts中
侧边栏的配置,我们可以分两种情况:全局导航栏、根据每个导航栏栏目分离式导航栏。
① 全局侧边栏配置
你可以设置侧边栏导航和导航栏的路由一一对应,这样就相当于是全局的侧边栏。
对于侧边栏的具体条目,可以通过设置children: "structure"根据当前目录下的文件名称自动生成。
import { sidebar } from "vuepress-theme-hope";

export default sidebar({
  "/": [
    "",
    {
      text: "React系列",
      icon: "react",
      prefix: "react/",
      children: "structure",
    },
    {
      text: "Vue系列",
      icon: "vue",
      prefix: "vue/",
      children: "structure",
    },
    {
      text: "Vite系列",
      icon: "tool",
      prefix: "vite/",
      children: "structure",
    },
    {
      text: "新框架尝鲜系列",
      icon: "geometry",
      prefix: "framework/",
      children: "structure",
    },
    {
      text: "杂谈",
      icon: "study",
      prefix: "posts/",
      children: "structure",
    },
    // "intro",
    // "slides",
  ],
});
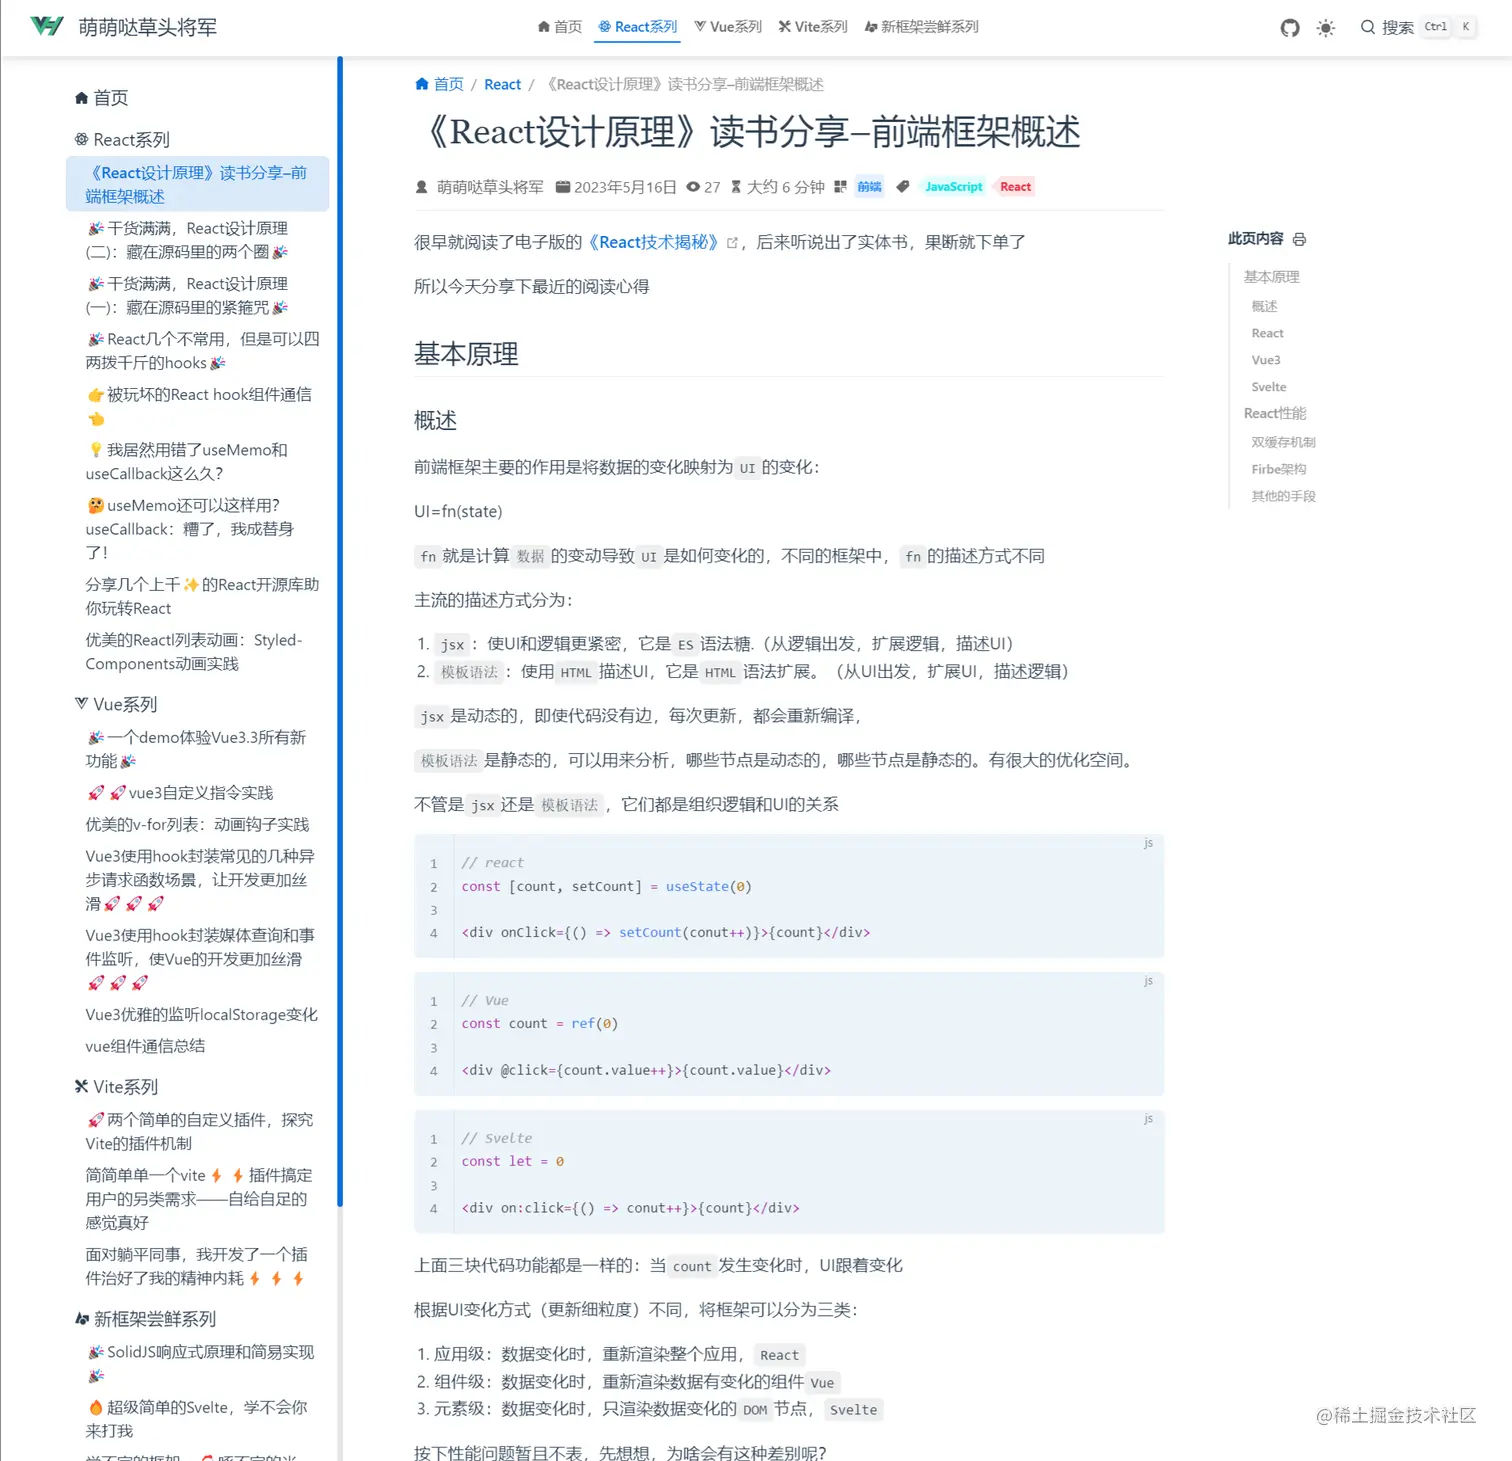
此时页面侧边栏如下图
② 分离式导航栏
分离式菜单配置更简洁,如下所示:当设置structure时,默认根据目录下的文件自动生成侧边栏。
import { sidebar } from "vuepress-theme-hope";

export default sidebar({
  "/react/":  "structure",
  "/framework/":  "structure",
  "/vite/":  "structure",
  "/vue/":  "structure",
  "/posts/":  "structure",
});

③ 自动生成目录页面
另外,我们还根据文件夹下的文件列表自动为每个文件夹生成目录页面。我们只需要在theme.ts中添加如下设置。
plugins: {
    autoCatalog: {
      index: true
    },
}
就可以自动生成目录页面了。例如:
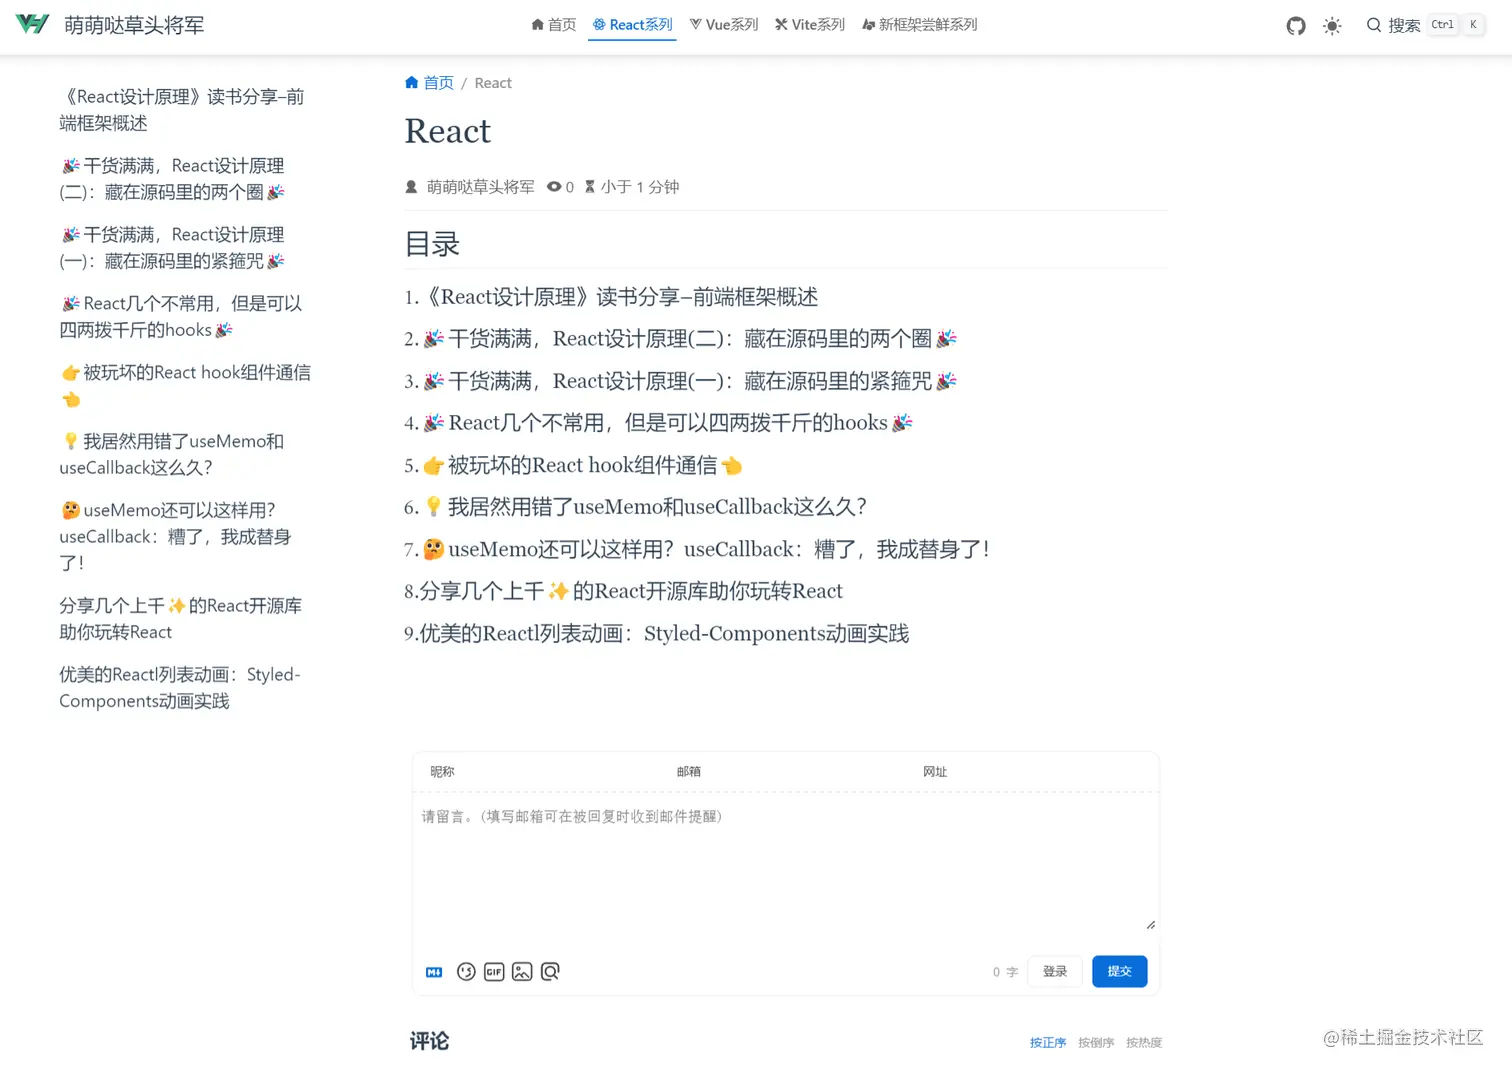
3.4 搜索功能
该主题内置了几种常见搜索插件的支持,你只需下载你喜欢的插件和配置文件即可,我使用的是vuepress-plugin-search-pro插件,配置参考的官方配置。
- 安装
vuepress-plugin-search-pro
pnpm add -D vuepress-plugin-search-pro
yarn add -D vuepress-plugin-search-pro
npm i -D vuepress-plugin-search-pro
- 在主题选项中配置
plugins.searchPro。
你可以将 plugins.searchPro 设置为 true 来直接启用它,或者将其设置为一个对象来自定义插件。
%%
plugins: [
    searchProPlugin({
      // 索引全部内容
      indexContent: true,
      // 为分类和标签添加索引
      customFields: [
        {
          getter: (page) => page.frontmatter.category as any,
          formatter: "分类:$content",
        },
        {
          getter: (page) => page.frontmatter.tag as any,
          formatter: "标签:$content",
        },
      ],
    }),
  ]
%%
import { defineUserConfig } from "vuepress";
import { hopeTheme } from "vuepress-theme-hope";

export default defineUserConfig({
  theme: hopeTheme({
    plugins: {
      searchPro: true,
      // searchPro: {
      //   插件选项
      // },
    },
  }),
});
效果如下:
